1、Netty入门
一、入门
服务端
public static void main(String[] args) throws Exception {
    //创建两个线程组bossGroup和workerGroup,
    //bossGroup只是处理连接请求,真正的和客户端业务处理,会交给workerGroup处理
    EventLoopGroup bossGroup = new NioEventLoopGroup(1);
    //含有的子线程NioEventLoop的个数默认为cpu核数的两倍
    EventLoopGroup workerGroup = new NioEventLoopGroup();
    try {
        //创建服务器端的启动对象
        ServerBootstrap bootstrap = new ServerBootstrap();
        //使用链式编程来配置参数
        bootstrap.group(bossGroup, workerGroup) //设置两个线程组
                //使用NioServerSocketChannel作为服务器的通道实现
                .channel(NioServerSocketChannel.class)
                //初始化服务器连接队列大小,服务端处理客户端连接请求是顺序处理的,所以同一时间只能处理一个客户端连接。
                //多个客户端同时来的时候,服务端将不能处理的客户端连接请求放在队列中等待处理
                .option(ChannelOption.SO_BACKLOG, 1024)
                .childHandler(new ChannelInitializer<SocketChannel>() {//创建通道初始化对象,设置初始化参数

                    @Override
                    protected void initChannel(SocketChannel ch) throws Exception {
                        //对workerGroup的SocketChannel设置我们自己写的Handler处理器
                        ch.pipeline().addLast(new NettyServerHandler());
                    }
                });
        System.out.println("netty server start......");
        //绑定一个端口并且同步, 生成了一个ChannelFuture异步对象,通过isDone()等方法可以判断异步事件的执行情况
        //启动服务器(并绑定端口),bind是异步操作,sync方法是等待异步操作执行完毕
        ChannelFuture cf = bootstrap.bind(8080).sync();
        //给cf注册监听器,监听我们关心的事件
        cf.addListener(new ChannelFutureListener() {
            @Override
            public void operationComplete(ChannelFuture future) throws Exception {
                if (cf.isSuccess()) {
                    System.out.println("监听端口8080成功");
                } else {
                    System.out.println("监听端口8080失败");
                }
            }
        });
        //对通道关闭进行监听,closeFuture是异步操作,监听通道关闭
        // 通过sync方法同步等待通道关闭处理完毕,这里会阻塞等待通道关闭完成
        cf.channel().closeFuture().sync();
    } finally {
        bossGroup.shutdownGracefully();
        workerGroup.shutdownGracefully();
    }
}
NettyServerHandler类
/**
 * 自定义Handler需要继承netty规定好的某个HandlerAdapter
 */
public class NettyServerHandler extends ChannelInboundHandlerAdapter {

    /**
     * 读取客户端发送的数据
     * @param ctx 上下文对象, 含有通道channel,管道pipeline
     * @param msg 就是客户端发送的数据
     * @throws Exception
     */
    @Override
    public void channelRead(ChannelHandlerContext ctx, Object msg) throws Exception {
        System.out.println("服务器读取线程 " + Thread.currentThread().getName());
        //Channel channel = ctx.channel();
        //ChannelPipeline pipeline = ctx.pipeline(); //本质是一个双向链接, 出站入站
        //将 msg 转成一个 ByteBuf,类似NIO 的 ByteBuffer
        ByteBuf buf = (ByteBuf) msg;
        System.out.println("客户端发送消息是:" + buf.toString(CharsetUtil.UTF_8));
    }

    /**
     * 数据读取完毕处理方法
     *
     * @param ctx
     * @throws Exception
     */
    @Override
    public void channelReadComplete(ChannelHandlerContext ctx) throws Exception {
        ByteBuf buf = Unpooled.copiedBuffer("HelloClient", CharsetUtil.UTF_8);
        ctx.writeAndFlush(buf);
    }

    /**
     * 处理异常, 一般是需要关闭通道
     *
     * @param ctx
     * @param cause
     * @throws Exception
     */
    @Override
    public void exceptionCaught(ChannelHandlerContext ctx, Throwable cause) throws Exception {
        ctx.close();
    }
}
客户端
public class NettyClient {
    public static void main(String[] args) throws Exception {
        //客户端需要一个事件循环组
        EventLoopGroup group = new NioEventLoopGroup();
        try {
            //创建客户端启动对象
            Bootstrap bootstrap = new Bootstrap();
            //设置相关参数
            bootstrap.group(group) //设置线程组
                    .channel(NioSocketChannel.class) // 使用NioSocketChannel作为客户端的通道实现
                    .handler(new ChannelInitializer<SocketChannel>() {
                        @Override
                        protected void initChannel(SocketChannel channel) throws Exception {
                            //加入自定义的Handle处理器
                            channel.pipeline().addLast(new NettyClientHandler());
                        }
                    });
            System.out.println("netty client start");
            //启动客户端去连接服务器端
            ChannelFuture channelFuture = bootstrap.connect("127.0.0.1", 8080).sync();
            //对关闭通道进行监听
            channelFuture.channel().closeFuture().sync();
        } finally {
            group.shutdownGracefully();
        }
    }
}
NettyClientHandler类
public class NettyClientHandler extends ChannelInboundHandlerAdapter {
    /**
     * 当客户端连接服务器完成就会触发该方法
     *
     * @param ctx
     * @throws Exception
     */
    @Override
    public void channelActive(ChannelHandlerContext ctx) throws Exception {
        ByteBuf buf = Unpooled.copiedBuffer("HelloServer", CharsetUtil.UTF_8);
        ctx.writeAndFlush(buf);
    }

    //当通道有读取事件时会触发,即服务端发送数据给客户端
    @Override
    public void channelRead(ChannelHandlerContext ctx, Object msg) throws Exception {
        ByteBuf buf = (ByteBuf) msg;
        System.out.println("收到服务端的消息:" + buf.toString(CharsetUtil.UTF_8));
        System.out.println("服务端的地址: " + ctx.channel().remoteAddress());
    }

    /**
     * 处理异常, 一般是需要关闭通道
     *
     * @param ctx
     * @param cause
     * @throws Exception
     */
    @Override
    public void exceptionCaught(ChannelHandlerContext ctx, Throwable cause) throws Exception {
        cause.printStackTrace();
        ctx.close();
    }
}
一些观念
把channel理解为数据的通道
把msg理解为流动的数据,最开始输入是ByteBuf,但经过pipeline()方法的加工,会变成其它类型对象,最后输出又变成ByteBuf
把handler理解为数据的处理器
处理器有多个,合在一起就是pipeline,pipeline负责发布事件,传播给每个handler, handler对自己感兴趣的事件进行处理(重写了相应事件处理方法)
handler分输入和输出两类。
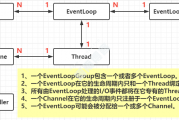
把eventLoop理解为处理数据的工人
工人可以管理多个channel的io操作,并且一旦工人负责了某个channel,就要负责到底(绑定)。
工人既可以执行io操作,也可以进行任务处理,每位工人有任务队列,队列里可以堆放多个channel的待处理任务,任务可分为:普通任务、定时任务。
工人按照pipeline顺序,依次按照handler的逻辑代码处理数据。
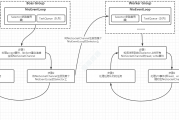
二、netty组件
关系图
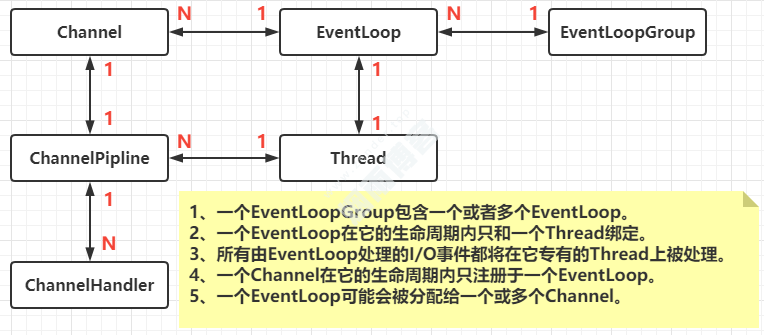
Channel,ChannelHandler,ChannelPipline的关系图
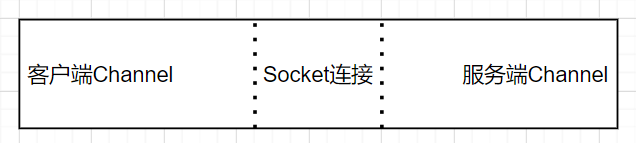
2.1、Channel(连接通道)
public interface Channel extends AttributeMap, ChannelOutboundInvoker, Comparable<Channel>{
}
-
Comparable:表示这个类可以用来做比较。
-
AttributeMap:用来存储Channel的各种属性。
-
ChannelOutboundInvoker:主要负责Channel和外部 SocketAddress 进行连接和对写。
2.2、ChannelFuture
channelFuture.sync(); // 阻塞住当前线程,直到nio线程连接建立完毕
异步调用处理结果。
channelFuture.addListener(new ChannelFutureListener() {
    @Override
    // 在 nio 线程连接建立好之后,会调用operationComplete
    public void operationComplete(ChannelFuture future) throws Exception {
        Channel channel = future.channel();
        channel.writeAndFlush("hello, world");
    }
});
处理关闭操作
Channel channel = channelFuture.sync().channel();
log.debug("{}", channel);
new Thread(()->{
    Scanner scanner = new Scanner(System.in);
    while (true) {
        String line = scanner.nextLine();
        //输入的是q时关闭
        if ("q".equals(line)) {
            channel.close(); // close 异步操作 1s 之后
            break;
        }
        channel.writeAndFlush(line);
    }
}, "input").start();

// 获取 CloseFuture 对象, 1) 同步处理关闭, 2) 异步处理关闭
ChannelFuture closeFuture = channel.closeFuture();
closeFuture.addListener((ChannelFutureListener) future -> {
    log.debug("处理关闭之后的操作");
    group.shutdownGracefully();
});
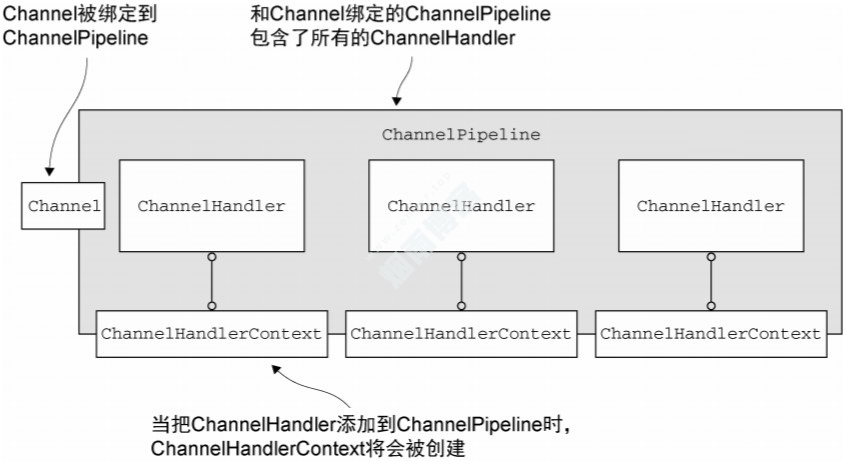
ChannelPipeLine是连接Channel和handler的桥梁,它实际上是一个filter的实现,用于控制其中handler的处理方式。
当一个channel被创建的时候,和它对应的ChannelPipeline也会被创建。
可以通过ChannelPipeline中有addFirst和addLast这种添加不同顺序的handler(ChannelPipeline指定了Handler的执行顺序)。
p.addLast("1", new InboundHandlerA());
p.addLast("2", new InboundHandlerB());
p.addLast("3", new OutboundHandlerA());
p.addLast("4", new OutboundHandlerB());
2.4、ChannelHandlerContext
2.5、ChannelHandler(Channel处理器)
//添加
void handlerAdded(ChannelHandlerContext ctx) throws Exception;
//移除
void handlerRemoved(ChannelHandlerContext ctx) throws Exception;
//异常事件机制。exceptionCaught事件处理方法由一个ExceptionEvent异常事件调用
void exceptionCaught(ChannelHandlerContext ctx, Throwable cause) throws Exception;
EventLoop本质是一个单线程执行器(同时维护了一个 Selector),里面有run方法处理Channel上源源不断的io事件。
//创建事件循环组
EventLoopGroup group = new NioEventLoopGroup(2); //可处理io事件,普通任务,定时任务
EventLoopGroup group = new DefaultEventLoopGroup(); //可处理普通任务,定时任务
//获取下一个事件循环对象
group.next();
//执行普通任务
group.next().execute(() -> {
    try {
        Thread.sleep(1000);
    } catch (InterruptedException e) {
        e.printStackTrace();
    }
   System.out.println("123");
});

//执行定时任务,第一个参数:执行体,第二个参数:初始延迟事件,第三个参数:间隔事件,第四个参数:事件单位。
group.next().scheduleAtFixedRate(() -> {
    log.debug("ok");
}, 0, 1, TimeUnit.SECONDS);
处理IO事件
public static void main(String[] args) {
    //创建一个独立的 EventLoopGroup
    EventLoopGroup group = new DefaultEventLoopGroup();
    new ServerBootstrap()
        //创建EventLoopGroup进。一个用于处理连接事件,一个负责读写事件处理
        .group(new NioEventLoopGroup(), new NioEventLoopGroup(2))
        .channel(NioServerSocketChannel.class)
        .childHandler(new ChannelInitializer<NioSocketChannel>() {
            @Override
            protected void initChannel(NioSocketChannel ch) throws Exception {
                ch.pipeline().addLast("handler1", new ChannelInboundHandlerAdapter() {
                    @Override                                         // ByteBuf
                    public void channelRead(ChannelHandlerContext ctx, Object msg) throws Exception {
                        ByteBuf buf = (ByteBuf) msg;
                        System.out.println(buf.toString(Charset.defaultCharset()));
                        ctx.fireChannelRead(msg); // 让消息传递给下一个handler
                    }
                }).addLast(group, "handler2", new ChannelInboundHandlerAdapter() {
                    @Override                                         // ByteBuf
                    public void channelRead(ChannelHandlerContext ctx, Object msg) throws Exception {
                        ByteBuf buf = (ByteBuf) msg;
                        System.out.println(buf.toString(Charset.defaultCharset()));
                    }
                });
            }
        })
        .bind(8080);
}
2.8、ByteBuf
// 创建了一个默认的 ByteBuf(基于直接内存的ByteBuf),初始容量是 10
ByteBuf buffer = ByteBufAllocator.DEFAULT.directBuffer(10);
//  ByteBufAllocator.DEFAULT.heapBuffer(10);基于堆内存创建ByteBuf
log(buffer);

private static void log(ByteBuf buffer) {
    int length = buffer.readableBytes();
    int rows = length / 16 + (length % 15 == 0 ? 0 : 1) + 4;
    StringBuilder buf = new StringBuilder(rows * 80 * 2)
        .append("read index:").append(buffer.readerIndex())
        .append(" write index:").append(buffer.writerIndex())
        .append(" capacity:").append(buffer.capacity())
        .append(NEWLINE);
    System.out.println(buf.toString());
}
输出
read index:0 write index:0 capacity:10
-
直接内存创建和销毁的代价昂贵,但读写性能高(少一次内存复制),适合配合池化功能一起。
-
直接内存对 GC 压力小,因为这部分内存不受 JVM 垃圾回收的管理,但也要注意及时主动释放。
池化的最大意义在于可以重用 ByteBuf,优点有
-
没有池化,则每次都得创建新的 ByteBuf 实例,这个操作对直接内存代价昂贵,就算是堆内存,也会增加 GC 压力。
-
有了池化,则可以重用池中 ByteBuf 实例,并且采用了与 jemalloc 类似的内存分配算法提升分配效率。
-
高并发时,池化功能更节约内存,减少内存溢出的可能。
-Dio.netty.allocator.type={unpooled|pooled}
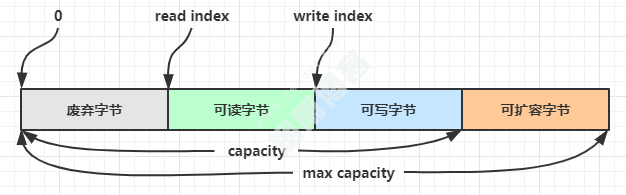
组成
方法列表,省略一些不重要的方法
扩容
-
如何写入后数据大小未超过512,则选择下一个16的整数倍,例如写入后大小为12 ,则扩容后capacity是16。
-
如果写入后数据大小超过512,则选择下一个2^n,例如写入后大小为513,则扩容后 capacity 是 2^10=1024(2^9=512 已经不够了)。
-
扩容不能超过max capacity会报错。
读取
//例如读了 4 次,每次一个字节
System.out.println(buffer.readByte());
System.out.println(buffer.readByte());
System.out.println(buffer.readByte());
System.out.println(buffer.readByte());
log(buffer);
读过的内容,就属于废弃部分了,再读只能读那些尚未读取的部分
1
2
3
4
read index:4 write index:12 capacity:16
如果需要重复读取int整数5,怎么办?可以在read前先做个标记mark
buffer.markReaderIndex();
System.out.println(buffer.readInt());
log(buffer);
结果
5
read index:8 write index:12 capacity:16
这时要重复读取的话,重置到标记位置reset
buffer.resetReaderIndex();
log(buffer);
结果
read index:4 write index:12 capacity:16
还有种办法是采用get开头的一系列方法,这些方法不会改变read index。
版权声明
非特殊说明,本文由Zender原创或收集发布,欢迎转载。

作者文章
- MyBatisCodeHelper-Pro3.3.6+2321破解 1年前 (2024-10-17)
- 网站迁移公告 2年前 (2024-10-10)
- Java项目防止SQL注入4总方式 3年前 (2023-09-06)
- JAVA开发小技巧--读取文件魔数来识别文件类型 3年前 (2023-08-24)
- 分类树菜单优化 3年前 (2023-08-22)
发表评论:
◎欢迎参与讨论,请在这里发表您的看法、交流您的观点。