Spring IOC
一,什么是Spring IOC
什么是依赖比如TestServiceImpl.class中有一个TestDao.class的属性,那么我们可以理解为TestServiceImpl依赖了TestDao
public class TestServiceImpl implements TestService{
    @Autowired
    private TestDao testDao;
}二、为什么要使用spring IOC
三、spring实现IOC的思路和方法
应用程序中提供类,提供依赖关系(属性或者构造方法)。
把需要交给容器管理的对象通过配置信息告诉容器(xml、annotation,javaConfiguration)。
把各个类之间的依赖关系通过配置信息告诉容器,让容器去管理和产生对象。
四、SpringIOC 3种编程的风格
<?xml version="1.0" encoding="UTF-8"?>
<project xmlns="http://maven.apache.org/POM/4.0.0"
         xmlns:xsi="http://www.w3.org/2001/XMLSchema-instance"
         xsi:schemaLocation="http://maven.apache.org/POM/4.0.0 http://maven.apache.org/xsd/maven-4.0.0.xsd">
    <modelVersion>4.0.0</modelVersion>

    <groupId>org.example</groupId>
    <artifactId>Spring Test</artifactId>
    <version>1.0-SNAPSHOT</version>
	<!-- 管理Spring版本号 -->
    <properties>
        <project.build.sourceEncoding>UTF-8</project.build.sourceEncoding>
        <spring.version>5.2.1.RELEASE</spring.version>
    </properties>

    <dependencies>
        <!-- Spring Context -->
        <dependency>
            <groupId>org.springframework</groupId>
            <artifactId>spring-context</artifactId>
            <version>${spring.version}</version>
        </dependency>
    </dependencies>
</project>public class TestDaoImpl implements TestDao {
@Override
public String test() {
return "TestDaoImpl";
}
}TestServiceImpl类依赖了TestDaoImpl类,通过set方法注入TestDao
public class TestServiceImpl implements TestService {
private TestDao testDao;
public void setTestDao(TestDao testDao) {
this.testDao = testDao;
}
@Override
public void printTest() {
System.out.println(testDao.test());
}
}xml配置文件,描述各个类的依赖关系
<?xml version="1.0" encoding="UTF-8"?> <beans xmlns="http://www.springframework.org/schema/beans" xmlns:xsi="http://www.w3.org/2001/XMLSchema-instance" xsi:schemaLocation="http://www.springframework.org/schema/beans http://www.springframework.org/schema/beans/spring-beans.xsd"> <bean id="testDaoImpl" class="com.zender.springioc.dao.impl.TestDaoImpl"/> <!-- 通过set方法注入 --> <bean id="testService" class="com.zender.springioc.service.impl.TestServiceImpl"> <!-- name:set方法名为:testDao(setTestDao去掉前缀set,并小写首字母,得到set方法名)--> <!-- testDaoImpl:需要注入的bean的id --> <property name="testDao" ref="testDaoImpl"></property> </bean> </beans>
测试类
public class Test {
public static void main(String[] args) {
ApplicationContext applicationContext = new ClassPathXmlApplicationContext("classpath:Test.xml");
TestServiceImpl testService = (TestServiceImpl)applicationContext.getBean("testService");
testService.printTest();
}
}
4.2、annotation(注解)风格
@Component("testDaoImpl")
public class TestDaoImpl implements TestDao {
    @Override
    public String test() {
        return "TestDaoImpl";
    }
}TestServiceImpl类依赖了TestDaoImpl类,通过注解@Autowired注入TestDao。
@Component("testServiceImpl")
public class TestServiceImpl implements TestService {
@Autowired
private TestDao testDao;
@Override
public void printTest() {
System.out.println(testDao.test());
}
}@Autowired默认是按照类型装配注入的,如果bean中存在多个以上同类型会如下报错:
org.springframework.beans.factory.NoUniqueBeanDefinitionException: No qualifying bean of type 'com.zender.springioc.dao.TestDao' available: expected single matching bean but found 2: testDaoImpl,testDaoImpl2
<context>子标记:
1,resource-pattern:仅希望扫描特定的类而非基包下的所有类。
2,include-filter:指定需要包含的包。
3,exclude-filter:指定需要排除的包。
4,type表示采用的过滤类型,共有如下5种类型:
<?xml version="1.0" encoding="UTF-8"?> <beans xmlns="http://www.springframework.org/schema/beans" xmlns:xsi="http://www.w3.org/2001/XMLSchema-instance" xmlns:context="http://www.springframework.org/schema/context" xsi:schemaLocation="http://www.springframework.org/schema/beans http://www.springframework.org/schema/beans/spring-beans.xsd http://www.springframework.org/schema/context http://www.springframework.org/schema/context/spring-context.xsd"> <context:component-scan base-package="com.zender"> <!-- 扫描注解了org.springframework.stereotype.Repository的类 --> <context:exclude-filter type="annotation" expression="org.springframework.stereotype.Repository" /> <!-- aspectj类型,扫描com.zender.dao下所有的类,排除entity下所有的类 --> <context:include-filter type="aspectj" expression="com.zender.dao. *" /> <context:exclude-filter type="aspectj" expression="com.zender.entity.*.*" /> </context:component-scan> </beans>
测试类
public class Test {
public static void main(String[] args) {
ApplicationContext applicationContext = new ClassPathXmlApplicationContext("classpath:Test.xml");
TestServiceImpl testService = (TestServiceImpl)applicationContext.getBean("testServiceImpl");
testService.printTest();
}
}
除了@Component外,Spring提供了3个基本注解和@Component等效,分别对应于用于对DAO,Service,和Controller进行注解(官方文档中说,在未来的Spring版本中这三个注解可能有更多的语义):
@Repository 用于对DAO实现类进行注解。
@Service 用于对业务层注解,但是目前该功能与 @Component 相同。
@Constroller用于对控制层注解,但是目前该功能与 @Component 相同。
@Component("testDaoImpl")
public class TestDaoImpl implements TestDao {
    @Override
    public String test() {
        return "TestDaoImpl";
    }
}TestServiceImpl类依赖了TestDaoImpl类,通过注解@Autowired注入TestDao。
@Component("testServiceImpl")
public class TestServiceImpl implements TestService {
    @Autowired
    private TestDao testDao;

    @Override
    public void printTest() {
        System.out.println(testDao.test());
    }
}创建一个SpringIocConfig用于描述Spring的配置
//表示这个类是Spring的配置类
@Configuration
//开启注解扫描,等同于xml中的context:component-scan
@ComponentScan("com.zender")
public class SpringIocConfig {
}测试类,通过AnnotationConfigApplicationContext来加载我们的SpringIocConfig配置类。
public class Test {
    public static void main(String[] args) {
        AnnotationConfigApplicationContext annotationConfigApplicationContext = new AnnotationConfigApplicationContext(SpringIocConfig.class);
        TestServiceImpl testService = (TestServiceImpl)annotationConfigApplicationContext.getBean("testServiceImpl");
        testService.printTest();
    }
}
五、Spring注入的2种方式
5.1、set方法注入
5.2、构造方法注入
public class TestServiceImpl implements TestService {
    private TestDao testDao;

    public TestServiceImpl(TestDao testDao) {
        this.testDao = testDao;
    }

    @Override
    public void printTest() {
        System.out.println(testDao.test());
    }
}
xml配置文件
<?xml version="1.0" encoding="UTF-8"?>
<beans xmlns="http://www.springframework.org/schema/beans"
       xmlns:xsi="http://www.w3.org/2001/XMLSchema-instance"
       xsi:schemaLocation="http://www.springframework.org/schema/beans
       http://www.springframework.org/schema/beans/spring-beans.xsd">

    <bean id="testDaoImpl" class="com.zender.springioc.dao.impl.TestDaoImpl"/>
     <!-- 通过constructor-arg指定构造方法注入的bean -->
    <bean id="testService" class="com.zender.springioc.service.impl.TestServiceImpl">
        <!-- name指的是构造方法注入的参数名称 -->
        <constructor-arg name="testDao" ref="testDaoImpl"></constructor-arg>
        <!--
			也可以通过下标来进行注入
			<constructor-arg index="0" ref="testDaoImpl"></constructor-arg>
		-->
    </bean>
</beans>
六、Spring xml风格配置扩展,P命名空间的使用(C命名空间也同样如此)
<?xml version="1.0" encoding="UTF-8"?>
<beans xmlns="http://www.springframework.org/schema/beans"
       xmlns:p="http://www.springframework.org/schema/p"
       xmlns:xsi="http://www.w3.org/2001/XMLSchema-instance"
       xsi:schemaLocation="http://www.springframework.org/schema/beans
       http://www.springframework.org/schema/beans/spring-beans.xsd">

    <bean id="testDaoImpl" class="com.zender.springioc.dao.impl.TestDaoImpl"/>
    <!-- 通过set注入 -->
    <bean id="testService" class="com.zender.springioc.service.impl.TestServiceImpl" p:testDao-ref="testDaoImpl">
    </bean>
</beans>
七,自动装配
上面说过,IOC的注入有两个地方需要提供依赖关系,一是类的定义中,二是在Spring的配置中需要去描述。自动装配则把第二个取消了,即我们仅仅需要在类中提供依赖,继而把对象交给容器管理即可完成注入。
在实际开发中,描述类之间的依赖关系通常是大篇幅的,如果使用自动装配则省去了很多配置,并且如果对象的依赖发生更新我们可以不需要去更新配置。
7.1、Spring注入方式ByType和ByName
<?xml version="1.0" encoding="UTF-8"?>
<beans xmlns="http://www.springframework.org/schema/beans"
       xmlns:p="http://www.springframework.org/schema/p"
       xmlns:xsi="http://www.w3.org/2001/XMLSchema-instance"
       xsi:schemaLocation="http://www.springframework.org/schema/beans
       http://www.springframework.org/schema/beans/spring-beans.xsd"
	   default-autowire="byType">
       <!-- 其实就是set方式注入,在没有指定name,取得是id的值 -->
   	   <bean id="testDaoImpl" class="com.zender.springioc.dao.impl.TestDaoImpl" autowire="byName"/>
</beans>
7.2、自动装配注解
@Resource默认是按byName称来装配注入的(根据属性名字来的,不是根据set方法的名字),只有当找不到与名称匹配的bean才会按照byType来装配注入,@Resource注解是由J2EE提供,而@Autowired是由spring提供,故减少系统对spring的依赖建议使用@Resource的方式。例如:
@Resource(name="testDao")
private TestDao testDao
@Autowired默认是按照byType装配注入的,如果想按照byName来装配注入,则需要结合@Qualifier一起使用。
@Resource和@Autowired都可以书写注解在字段或者该字段的setter方法之上。
@Autowired 可以对成员变量、方法以及构造函数进行注释,而 @Qualifier 的注解对象是成员变量、方法入参、构造函数入参。
@Qualifier("XXX") 中的XXX是 Bean 的名称,所以 @Autowired 和 @Qualifier 结合使用时,自动注入的策略就从 byType 转变成 byName 了。例如:
@Autowired
@Qualifier("testDao")
private TestDao testDao
@Autowired 注释进行自动注入时,Spring 容器中匹配的候选 Bean 数目必须有且仅有一个,通过属性required可以设置非必要。
//默认required = true @Autowired(required = false) @Qualifier("testDao") private TestDao testDao@Resource装配顺序
如果同时指定了name和type,则从Spring上下文中找到唯一匹配的bean进行装配,找不到则抛出异常。
如果指定了name,则从上下文中查找名称(id)匹配的bean进行装配,找不到则抛出异常。
如果指定了type,则从上下文中找到类型匹配的唯一bean进行装配,找不到或者找到多个,都会抛出异常。
如果既没有指定name,又没有指定type,则自动按照byName方式进行装配;如果没有匹配,则回退为一个原始类型进行匹配,如果匹配则自动装配;
八、懒加载
懒加载是程序使用到这个类时才加载,初始化。
<?xml version="1.0" encoding="UTF-8"?>
<beans xmlns="http://www.springframework.org/schema/beans"
       xmlns:p="http://www.springframework.org/schema/p"
       xmlns:xsi="http://www.w3.org/2001/XMLSchema-instance"
       xsi:schemaLocation="http://www.springframework.org/schema/beans
       http://www.springframework.org/schema/beans/spring-beans.xsd"
default-lazy-init="true">

    <bean id="testDaoImpl" class="com.zender.springioc.dao.impl.TestDaoImpl" lazy-init="true"/>
    <!-- 通过set注入 -->
    <bean id="testService" class="com.zender.springioc.service.impl.TestServiceImpl" p:testDao-ref="testDaoImpl">
    </bean>
</beans>
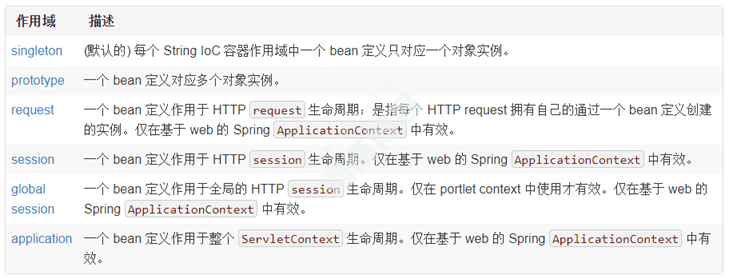
九、Spring Bean的作用域
我们可以使用scope属性指定作用域,作用域有以下7个:
例如:
<!-- 修改对象的作用域 -->
<bean id="person" class="com.zender.springioc.dto.Person" scope="prototype"></bean>
public class Test {
    public static void main(String[] args) {
        ApplicationContext applicationContext = new ClassPathXmlApplicationContext("classpath:Test.xml");
        Person person = (Person)applicationContext.getBean("person");
        Person person2 = (Person)applicationContext.getBean("person");
        System.out.println(person.hashCode());
        System.out.println(person2.hashCode());
    }
}
9.1、关于Bean的作用域的一个问题
@Component("testDaoImpl")
//更改TestDaoImpl的作用域prototype(非单例)
@Scope("prototype")
public class TestDaoImpl implements TestDao {
    @Override
    public String test() {
        return "TestDaoImpl";
    }
}
测试类
public class Test {
public static void main(String[] args) {
AnnotationConfigApplicationContext annotationConfigApplicationContext = new AnnotationConfigApplicationContext(SpringIocConfig.class);;
TestService testService = (TestService)annotationConfigApplicationContext.getBean("testServiceImpl");
TestDao testDao = testService.getTestDao();
TestService testService2 = (TestService)annotationConfigApplicationContext.getBean("testServiceImpl");
TestDao testDao2 = testService2.getTestDao();
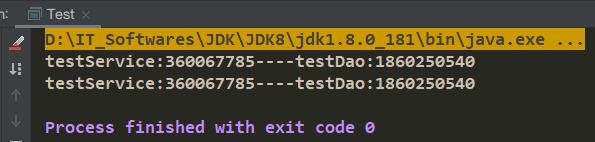
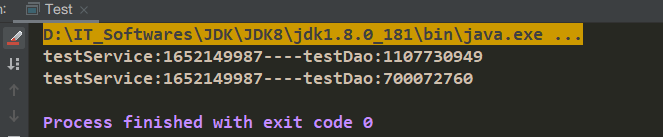
System.out.println("testService:"+testService.hashCode()+"----testDao:"+testDao.hashCode());
System.out.println("testService:"+testService2.hashCode()+"----testDao:"+testDao2.hashCode());
}
}
1、修改TestServiceImpl类,实现ApplicationContextAware接口(该方式过于依赖Spring代码,不建议使用)
@Component("testServiceImpl")
public class TestServiceImpl implements TestService, ApplicationContextAware {
    private ApplicationContext applicationContext;

    @Override
    public TestDao getTestDao() {
        return (TestDao)applicationContext.getBean("testDaoImpl");
    }

    @Override
    public void setApplicationContext(ApplicationContext applicationContext) throws BeansException {
        this.applicationContext = applicationContext;
    }
}
2、通过注解@Lookup()
@Component("testServiceImpl")
public class TestServiceImpl implements TestService {

    @Autowired
    private TestDao testDao;

    @Lookup
    public TestDao getTestDao() {
        return testDao;
    }

    @Override
    public TestDao getDao() {
        return this.getTestDao();
    }
}<bean id="myCommand" class="fiona.apple.AsyncCommand" scope="prototype"></bean> <bean id="commandManager" class="fiona.apple.CommandManager"> <lookup-method name="createCommand" bean="myCommand"/> </bean>
版权声明
非特殊说明,本文由Zender原创或收集发布,欢迎转载。


作者文章
- MyBatisCodeHelper-Pro3.3.6+2321破解 1年前 (2024-10-17)
- 网站迁移公告 2年前 (2024-10-10)
- Java项目防止SQL注入4总方式 3年前 (2023-09-06)
- JAVA开发小技巧--读取文件魔数来识别文件类型 3年前 (2023-08-24)
- 分类树菜单优化 3年前 (2023-08-22)
发表评论:
◎欢迎参与讨论,请在这里发表您的看法、交流您的观点。